Getting your web font to display correctly can be tricky. Just because there’s a little more to learn when working with web fonts, however, doesn’t mean you can’t have beautiful typography on your website.
If you are a print designer, you know that your design won’t print correctly unless you convert your design to a PDF or send the printer the fonts along with the design files. If you’ve ever created a PowerPoint presentation (we make these, by the way), you know that the fonts you use on your own computer may not be on the computer you present from, so you have to plan accordingly or you might end up with something like this:

But this is what it looks like on D-Day:

Well, lucky for us, those pesky font display problems exist on your web page as well.
The thing is, online fonts only display correctly if the computer (or other device) viewing the site has access to the same fonts. With print graphics and PowerPoint presentations, you have a little bit of control over whether the end user will also have the same fonts; you can also convert fonts to outlines or present from your own laptop.
With web typography, however, you don’t have that level of control. Your site may be viewed by (hopefully) thousands if not millions of viewers who do not have the same fancy fonts installed on their systems as you do. Hence, the need for web safe fonts.
How not to fix the problem of web fonts
Once upon a time, web designers might have typed their block of text in their cool font in Photoshop, exported the text block as an image, and uploaded that image onto the website, giving the illusion of a cool web font being displayed online. They may have even built their site’s layout using tables, or (godforbid) frames. Yeah, well, we all made mistakes in the ‘90s.
You CANNOT set text as an image today for two reasons. Most importantly, text that is converted to image cannot be read by a screenreader program (such as JAWS) designed to aid visually-impaired users viewing your site, nor can it be read by search engines combing through your site’s content. Which means that people are less likely to be able to access your content. Not a good move if you’re trying to get people to actually go to your website.
Secondly, converting your text to image forces your text into a specific size; your text cannot scale or re-wrap depending on the screen size it’s viewed on. What does that mean in plain English? Your text block will look like sh*t on a smart phone.
How to successfully get fonts to display correctly on a website
If you want your site’s fonts to look the same across all users’ browsers, you have 3 options to choose from. They each have their own levels of desirability, depending on your needs.
Option 1: Use a CSS font stack.
You tell your user’s browser what font to display on your website using CSS (I hope). When you declare a font rule in CSS, it’s common practice to give the browser several options to choose from. A font declaration gives the browser options within a font family property, and it usually looks something like this:
h1, h2, p {
font-family: Helvetica, Arial, sans-serif;
}
So, what this tells the browser:
- Display the text of all heading 1, heading 2, and paragraph elements in Helvetica.
- But, if the user’s device doesn’t have Helvetica, use Arial.
- And, if for some bizarre reason the user doesn’t even have Arial, use whatever sans serif font you can find. In this case the computer will look for installed fallback fonts that it considers to be sans serif fonts.
These “font stacks” as they’re called usually use a series of fonts considered “web safe fonts.” That is, they are a list of popular web fonts that most people have on their devices, because they come standard-issue with most operating systems.
How to use the font-family declaration
If you wish, you can copy the code above and place it into your CSS document.
Replace “h1, h2, p” with all elements you want the font to adhere to. If you want this font family to be the default font stack for your site, then replace those elements with “body” and be done with it.
Type your font stack after “font-family:” but, keep in mind, any fonts that are more than one word need to be written in quotes. So, if your font family is going to include Times New Roman, for instance, you would need to write your rule something like this:
body {
font-family: Palatino, Georgia, "Times New Roman", serif;
}
Note that the comma comes after the quotes of “Times New Roman” in the code. Because code has its own grammar.
Exploring web fonts
Here is a brief list of fonts considered “web safe fonts.” Keep in mind you always want to include a handful of these in each font-family declaration in your CSS so that something close to what you want will appear in the browser.
Web-safe sans serif faces:
- Arial
- Helvetica
- Impact
- Verdana
- Trebuchet MS
- Geneva
- Lucida Grande
Web-safe serif faces:
- Times
- Times New Roman
- Garamond (possibly the most elegant serif font of the web safe fonts)
- Georgia
- Palatino
- Courier (a monospace serif font, technically a slab serif)
(Comic Sans is also a web safe font, but it might cause pain to your users’ eyes. Please replace with Trebuchet MS if you feel the need to use a cute sans serif font.)
Unfortunately, this means that you are very limited in the web fonts you can use on your site—I mean, who wants to design strictly in a derivative of Arial? That’s why you might choose one of the other two options below to get some more customization for your web typography.
Option 2: Link to an online font library
Want to use an online web font library? oh the places you’ll go! I’m going to talk about 2 popular ones, but these are by no means the only ones out there.
Google Fonts
This is hands-down my go-to solution. Google has hundreds of gorgeous fonts, free for your use, and available to anyone browsing the web who has an internet connection (because, well, they wouldn’t be browsing if they didn’t, right?).
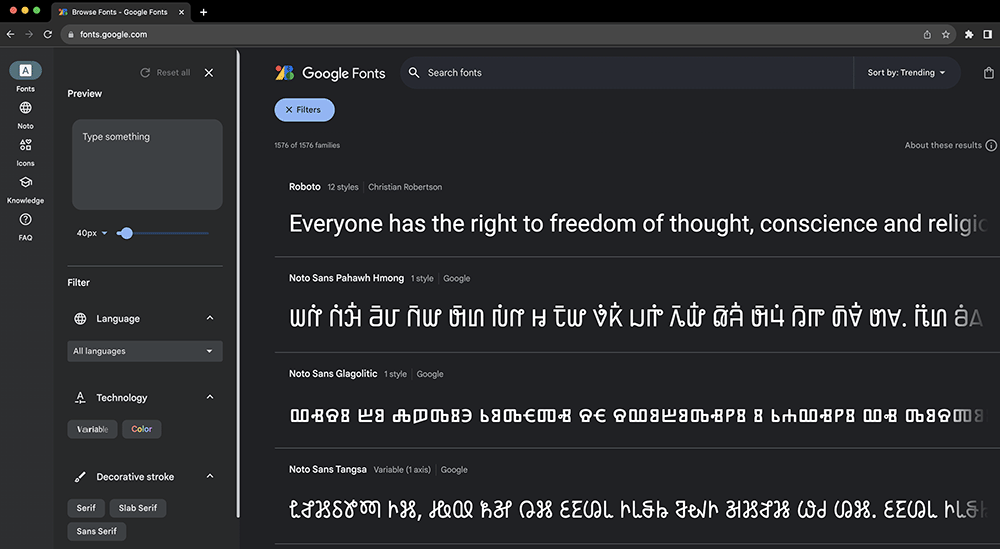
To get started with Google web fonts, navigate to fonts.google.com and just start exploring. On the left-hand side of your screen you can narrow down your options (sans, serif, display, script, etc.) And on the right-hand side you can get lost ogling all these beautiful, FREE fonts that you, yes you, can put on your site. And these fonts will display nicely on your website.
Linking Google Fonts to your website
To use a Google font, click on the font you’ve fallen in love with. Then, click the button that says “Get Font.”
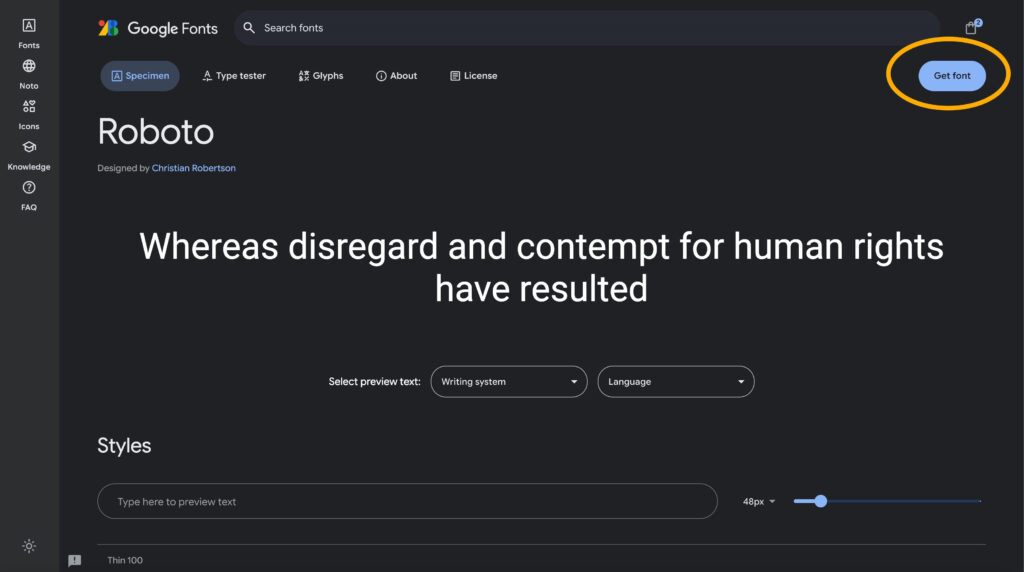
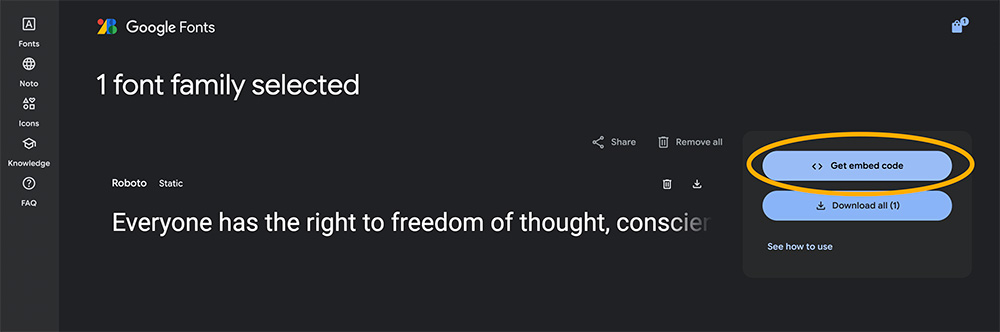
The next page will give you several options for how to work with the font. For the purposes of this exercise, choose “Get Embed Code.”
On the next screen, you’ll be able to grab the code you need to insert into your site to get the Google font to display correctly. With a static font (as with Roboto below), you’ll also have the option to choose specific weights of the font you want displayed on your site. However, be aware that the more weights you choose, the more the font could slow down your site speed.
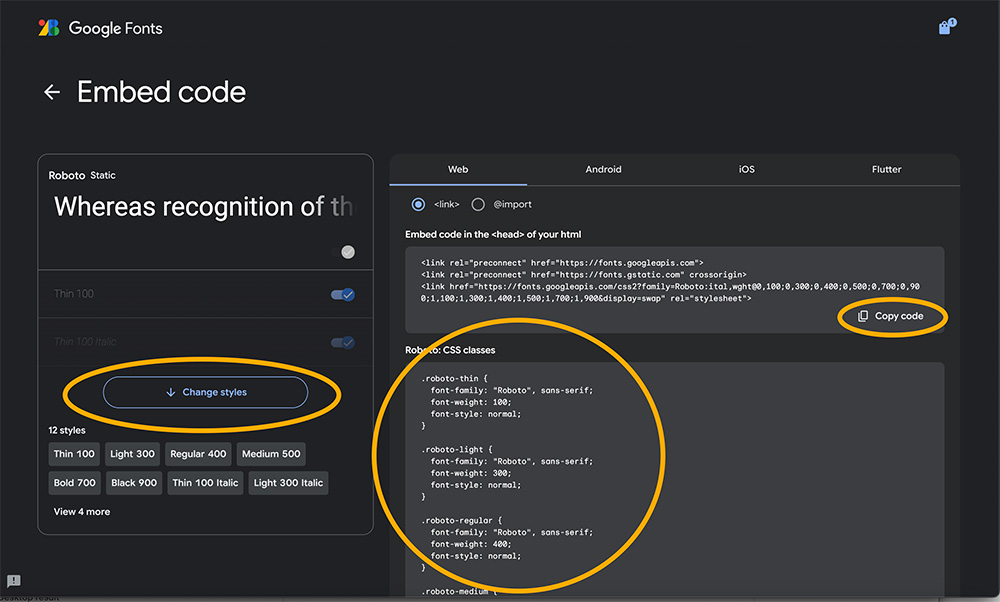
Let’s start by learning how to link to Google fonts. On the right-hand side of the screen you’ll see some code under “Embed code in the <head> of your html.” There will be a bit of code that starts with “<link href=”https://fonts.googleapis.com/css?family= …” and a Copy Code option. Copy that code and paste between the <head> tags of every HTML page you want the font to appear in (this is where templating is nice).
Next, Google provides you with the font-family declaration you can place right in your CSS. For instance:
body {
font-family: 'Roboto', sans-serif;
}
You’ll place this declaration in your CSS code.
Use the @import rule instead of linking
You can also use the @import rule to add a Google font to your CSS instead of your HTML. If you only have one stylesheet but no templates, this might be easier for you as you only need to put the code in one place for your fonts to display on your entire website.
How do you use @import? In that same pop-up window in Google fonts, instead of clicking on the Link radio button, choose the @Import button and copy the code between the two <style> tags directly into your CSS (don’t include the <style> opening and closing tags in the CSS document—you’ll confuse the browser).
And there you go! Easy peezy lemon squeazy.
Are you a WordPress user without CSS chops? No problem! There are several Google font plugins you can grab that will do the same thing for you and make your blog fonts gorgeous. Check out this article for a list of Google font plugins and other WordPress font resources.
Worried that Google fonts will slow down your load time? (Because, too many of them can.) My best practice is to choose 1–3 weights of a Google font and use a web safe font (from Option 1) as my secondary face. So, I might use something gorgeous for all of my serif type. But I’ll just use Arial for the boring legalize that goes in the footer. Believe it or not, there’s still a lot that can be done with Arial. You can lighten the color and add a little letter-spacing, and it almost looks decent.
Adobe Fonts
If you have an Adobe CC subscription, you have access to Adobe Fonts. And web fonts are one of the myriad font options now at your fingertips. You can get to Adobe fonts through your Creative Cloud manager or navigate to fonts.adobe.com.
(I should note that all the fonts you have access to are just another one of the great perks of having an Adobe CC subscription. Design students ask me all the time if it’s worth it to get the subscription, and my answer is always a loud, resounding “YES!”)
Adding fonts from Adobe Fonts is very similar to that of Google Fonts. They have a nice tutorial here.
If you use Adobe web fonts for client projects, your client will also need an Adobe CC subscription in order for those fonts to legally appear on their site—at least as of the end of 2019, as I understand Adobe’s documentation. So, make sure you know your client can adhere to this before using Adobe fonts on their website project.
Option 3: Using @font-face
Okay, so this one gets a little tricky. In order to use this option you’ll need to know how to code. And you’ll need FTP access to your server. But using the @font-face rule does give you even more options for your web typography, including using fonts you’ve actually paid for.
The thing is—you can technically put any font on your website using @font-face, but that font’s End User Licensing Agreement (EULA) may not legally allow for fonts to be embedded on a website. In English: just because you bought a license for that font doesn’t mean you have permission to put it on your website. Once you upload a font to your server for your website to pull it from, you’ve put licensed material in a public place where it could theoretically be extracted.
However, if you have a font that you know you can embed on your site without violating its EULA, or you’ve created a custom font yourself (go you!), then this is how you use @font-face.
Step 1: Convert your font to a format the browser will read
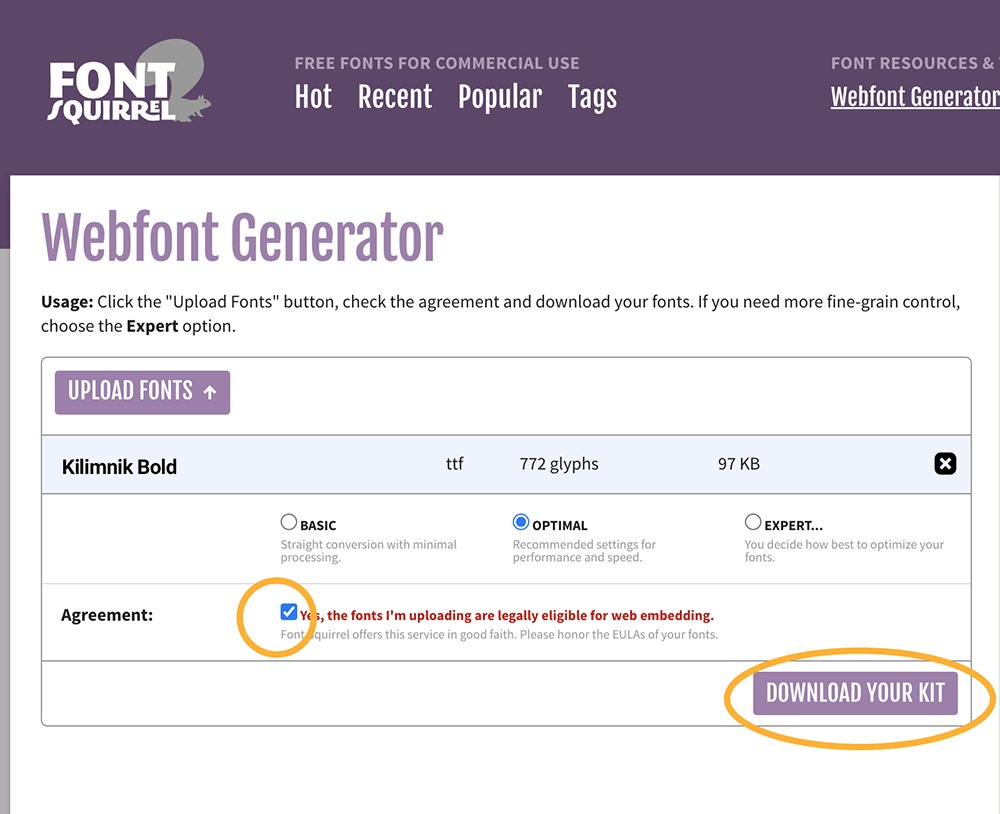
This is actually pretty easy to do, thanks to an awesome resource called Font Squirrel. Simply navigate to the Font Squirrel generator and upload your fully legal font using the Upload Fonts button. (Font Squirrel makes you acknowledge that the fonts you are uploading have licenses that allow for web embedding.)
After a few seconds, Font Squirrel will create a web font kit which you can download by clicking the Download Your Kit button.
Unzip the file you downloaded from Font Squirrel. You’ll see several font file options (with .ttf, .otf, .woff and/or .woff2 extensions) along with a stylesheet.css file. Upload all the font files to your server and make note of where they live. So, for me, since my site is at theconceptspot.com, it would make sense for me to upload my fonts to a folder called theconceptspot.com/fonts (but, I don’t have a folder called that because I don’t embed web fonts).
Step 3: Make the CSS work
There’s two ways you can do this. You’ll see a file in your downloaded kit called stylesheet.css, so you can upload this file to your server and then link your HTML file to this CSS file the same way you link to your other CSS files. Assuming the same directory structure I mentioned in Step 2, in the head of your HTML, you’d type
<link href="fonts/stylesheet.css" rel="stylesheet" type="text/css">
Of course, you need to do this with every HTML file on your site if you aren’t using templates. Assuming you’ve already linked every file to a master CSS stylesheet, you could simply copy the CSS code from stylesheet.css and place it into your main CSS file. You will need to adjust the pathnames to accommodate the actual location you put your files on your server. So, again with my theoretical directory structure, that snippet would look something like this:
@font-face {
font-family: 'KilimnikFont';
src: url('KilimnikFont-webfont.woff2')format('woff2'),
url('KilimnikFont-webfont.woff')format('woff'),
/* insert any other formats included in your kit */
font-weight: normal;
font-style: normal;
}
Now, you can apply this new font to whichever elements you please. For instance:
p {
font-family: 'KilimnikFont', serif;
}
(Notice that I still included a backup default. I mean, hopefully you would never need this because you’ve hosted your fonts on the same server as your site, but backups are good).
I would be remiss not to mention that Font Squirrel also has tons of free fonts available that you can legally use on your site. It’s worth checking out.
In Conclusion…
So, there you have it! Of course, if you ever run into problems with your web fonts or need an expert developer to help get your site looking pretty, feel free to reach out.